Saturday, July 28, 2012

T-Shirt: Link (The Legend of Zelda)

I love making character t-shirts.  One of my 14-year-old nephews asked me the other day if I would make him one.  He decided that he'd like me to make Link, from The Legend of Zelda.

I started, as always, with a sketch of Link, his sword, and his shield.  His shield was kind of difficult to decide which details I wanted to leave in and which would come out good in felt.  


Once my nephew approved the sketch, I went ahead and made him out of felt.


I'll sew him down to the t-shirt tonight (my nephew wanted him on black).  Meanwhile, my other 14-year-old nephew told me that he'd also like Link on a black t-shirt.  So I went ahead and made another.


I'm getting ready to do Luigi for my niece.  That one should be a lot of fun!

I've been thinking about making my sketches available on PDF, in case any body else wanted to use them.  Would anybody be interested?


Pin It

Tuesday, July 24, 2012

More chores and earning money

My kids are forever wanting to buy things.  In order to buy things, they need money.  We don't do an allowance, and birthdays are only once a year.  They've been desperate to earn money.  My son came to me the other day, asking me to pull his tooth.  The way he was talking, it was so loose it would soon be falling out of his mouth.  I'm still not sure it's really loose at all.  But he was hoping to put it under his pillow to get more money towards whatever the snake hook he's really, really wanting (his favorite show on Netflix is The Jeff Corwin Experience).

 I told my hubby that before the kids start getting some crazy ideas of how to knock teeth out, we need a way for them to earn money.  And maybe we can get some stuff done around the house at the same time.  Win-win!!  

We came up with a list of chores that need to be done around the house--most on a weekly basis.  We then came up with money amounts that job is worth (turns out we're pretty cheap).


I cut 3x5 cards in half and wrote the chores out (along with instructions and needed materials) on them. I slid them into those baseball card protector sheets and put them in the family control journal that's on the counter--the same binder that holds the family schedules.

Any time the kids want to earn some extra cash loose change, they can go to that and pick whichever one(s) they want to do.  It has to be done on their own time and to my satisfaction.  And all of them (other than sweeping the floor and brushing the dog) can only be done once a week--that way I don't have one of them scrubbing the back door one night and another one picking the same chore first thing the next morning.  Since they're in the card protectors, they can mark them off with a dry-erase marker.  The marks can be erased at the beginning of each week.

Some examples are:  Cleaning the front door will earn you 20 cents (I make our glass-cleaner, etc.  No yucky chemicals I have to worry about).  Putting away toys from behind and under the couch and using the hand-vac under the couch cushions will get you a quarter.  Picking up dog potties from the yard gets you a dollar (not really a bad deal if it's really done weekly--he only goes once a day).  When it's all added up, it totals just over $4 a week.  Not too shabby for us to get some of these odd jobs done that we never seem to get around to.  After all, how often do you wipe your window sills?  And they're excited to have a less painful way to earn money.  After all, you only have so many baby teeth...
Pin It

Thursday, July 19, 2012

Family Schedules

My chore system is constantly undergoing renovation.  With the number of people in this house, things can get out of hand quickly.  As the children get older and are able to do more, our expectations of them change.  Each child has their own chore chart (I'm working on making the little ones' charts out of pictures).

You can see here that some things are marked off.  As I said, this is ever-changing.  We see what works and what doesn't, and I can just change it on the computer and print out a new one whenever.


This is a VERY flexible schedule.  The times are very approximate.  The JOY part is important in two ways.  One, it's a big mantra around here to keep Jesus first, Others second, Yourself last.  Others should be treated with respect, etc.  Another thing is that every chore needs to be done with the proper attitude--a joyful one!!!  I don't want grumbling and snarky remarks.

If they do all their chores for that day correctly:  in a timely manner, done to my satisfaction, done with the correct attitude, they get a sticker on a piece of paper on their bedroom door.  They LOVE picking their stickers out of my big sticker box.  Each sticker gets them 15 minutes of iPod play, to be done with a timer and on their own time.

So far, this system is working out well--both for them and for us.  I don't have time to make sure everybody is on task every moment of the day.  I got tired of asking "Did you do..." just to hear "I forgot."  Now it's all on paper, so no forgetting.  All the charts are kept in a binder on the small counter beside our refrigerator.

There are also weekly chores they can choose from.  I'll tell about those in my next post.

How do you organize the chores in your house?
Pin It

Monday, July 16, 2012

Quick Tip #6--Storing Kids' Artwork

My kids draw pictures and make things for me ALL THE TIME.  And they expect me to save and treasure every single one.  I do treasure them, but I don't have the inclination (or space) to store all of those papers and things.

The solution is simple:  take pictures!!

Star Wars is a big theme around here.  My 7-year-old son drew these:


In case you missed some of those details, here's Princess Leia.  See the buns?


And here's Yoda.  I love the frownie faces.  And the stick legs with ball feet.


He's not alone in his Star Wars fixation.  My 4-year-old son did this one of Darth Maul.  He was so proud of how he turned out.  Fierce.


He also did these of Yoda.  Star Wars art is so simple, no bodies required!


My 5-year-old daughter did this one of my husband.  The body is included, but no clothes.


I typically like to label the artwork with the child's name and age, though you can tell by those above that I often forget.


Some things the kids want to keep on paper, not just the computer.  They typically do those things into composition books.  My seven-year-old son is currently writing his own reptile book, complete with drawings.  =)  My nine-year-old daughter is currently writing her own comic book, again in a composition book:


You can also do pictures of things they build, paint, etc.  It all stores nicely on a computer, disc, etc.

How do you store your kids' projects?
Pin It

Friday, July 13, 2012

Vintage Treasures

I've spoken a couple of times about my grandma, who has Alzheimer's.  Several of us grandchildren have gotten some of her belongings.  My sister had gotten some of her sewing goodies and recently passed a bunch of them on to me!!

One of the first things I saw were these old tins.


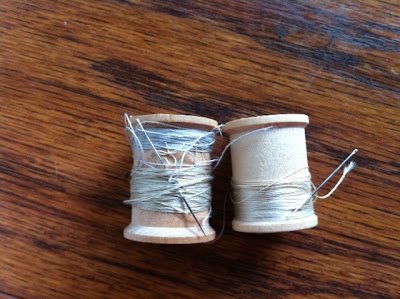
I opened one to find it full of old wooden spools of thread.  


Most were marked 15 cents!!  And almost all were marked "fast to boiling" or "boilfast."  How glad I am that I don't live back in the days when they used washboards and boiled their clothes!


Some were super shiny, and I realized they were silk.  Look at those gorgeous colors!


Some of the spools still had needles attached.  I couldn't help but wonder what projects Grandma was working on.


These threads are too old to use, so I'm thinking of asking my hubby to make me something like this tree from Home Design Property to display them.


The bag my sister gave me was also full of TONS of vintage lace and trims.

It took me a while to get it all untangled and separated.  Grandma had some of it wound onto old hangers.  I separated it all out into storage bags.  Anybody have better storage ideas?


These trims were wound around an old thank-you card from my uncle to my great-grandparents, when my uncle was a kid.  So I'm not sure if Grandma never gave them the card or if these once belonged to my great-grandma.


There were also some old fabrics, buttons, snaps, etc.  But one of my absolute favorite items was this tape.


It doesn't look too exciting until you start reading the suggested uses for it.


Too bad it's probably not latex-free.  You never know when you might need a "stick" figure.

What vintage treasures have you come across lately?


Pin It

Monday, July 9, 2012

Amazing Fabric Deal!!

So, many Wal-Marts have destroyed their fabric section by no longer carrying fabric on the bolt (though I was told by a Wal-Mart worker that they'll be bringing the bolts of cloth back, though she didn't know when).  The other day, our local Wal-Mart was getting rid of some bolts of fabric they still had--at $1 a yard!!  Yes, you read that right, ONE DOLLAR A YARD!!!!

It wasn't paycheck week, so I couldn't go as crazy as I would have liked.  So I took a deep breath and grabbed a few of my favorites:

You can't really tell the color right of this one.  It's a nice, tan polyester--darker than it looks here.  I practically saw the Jedi robes for Halloween jumping out of this one at me!  I can't wait to get started on those!  I emptied this bolt, about 4.5 yards.


I got two yards of this silky sheer.  I'm thinking scarves for Christmas?


I have no idea what I'm going to do with the rest of the fabric.  These are all cottons.  I got 4 yards each of these:


And these:


And I emptied the bolt of the final yard of this one.  Again, you can't exactly tell the color.  It's on kind of a subtle lime green background (if lime green can be subtle):


Any project ideas jumping out at you for these cottons?  My sewing machine is just itching to get it's...um...foot on these!  =)
Pin It

Friday, July 6, 2012

Fabric Hair Bows--Fail and Win!!

I totally can't do any kind of clothing project for my girls without making matching hair clips.  So when I worked on lengthening their dresses recently, I of course had to put the fabric scraps left over to good use.

First I tried to make a fabric daffodil, as shown in the first tutorial here, at Crafti Staci.  Can you say FAIL?!?!?!?!?!  Mine totally didn't turn out good, unless I was trying to make a wilted, lopsided daffodil.  If that was the case, then I totally nailed it!  Unfortunately, that wasn't the case.


It took a lot of time and turned out horrible.

I had already cut all of my left over scraps into 4" squares to make the flowers above.  I guess I suffer from a horrible case of over-confidence.  After all, the tutorial didn't look too difficult.  I'm sure the tutorial isn't the problem here.  =)

Anyway, my options were now limited to the fact that I was running out of time and the fact that I only had 4" squares and a couple of long strips left.  So I decided to go way easy, pinked the edges of 4 of the squares and made accordion bows.


I glued these down onto ribbon-lined hair clips.  They took a total of about 2 minutes.  And that, my friends, is a total WIN!!!

Have you had any fails lately?

Pin It

Tuesday, July 3, 2012

Lengthening Dresses

A dear lady at church recently bought matching dresses for my older two girls.  These dresses are GORGEOUS!


The embroidery is beautiful.


Unfortunately, my 9-year-old's dress was just a bit too short.  It would have been ok for her to wear a couple of times, but that's it.  So I needed to lengthen it.  Not wanting them to be different, I decided to lengthen them both.

I was frantically getting ready for church camp at the time, so I ran to our local quilt shop for fabric, not wanting to spend the gas money and time to run all the way up to the large city.  Unfortunately, the only all-white fabric the local shop had was a muslin that was much too heavy for these light, airy dresses.  So I decided instead to match the embroidery.  I found this light and subtle printed fabric that I knew would work great!


I measured it out and ruffled it.  I didn't want to attach it to the bottom hem of the dress.  I wanted both the white and printed ruffles to be free-hanging.  So I attached it at the seam where the white ruffle was attached.  Here's the final result.  I'm thrilled with it!  And I'm kind of glad the shop didn't have any plain white cotton.  I really like the look of the bottom ruffle matching the embroidery instead.  It gives it more character.


Now this dress will fit my daughter for a while.  Yay!!


What projects are you working on?


Pin It