Showing posts with label hair clips. Show all posts

Wednesday, May 9, 2012

Butterfly Hair Clips

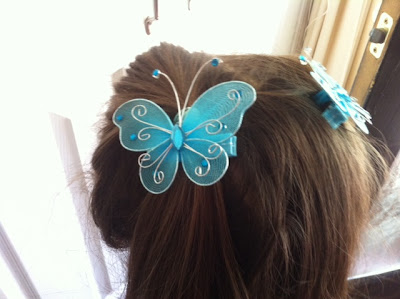
As I've stated a few times before, I love making hair clips out of various items that weren't originally intended for hair clips.  This time I totally scored at Dollar Tree!!  I was walking through the aisles when I came across these gorgeous butterfly picks.  I bought one in every color.  The package on the far right are felt butterfly stickers, found in the scrapbooking section of some store (can't remember where).


For the butterfly picks, I used wire cutters to cut the metal pokes off the back.  Then I lined some clips with ribbon and glued the butterflies on.  They're gorgeous!!


My 5-year-old daughter loves the pink and purple ones together.  What little girl doesn't?  Especially when they have sparkly "jewels"!!


For the felt stickers, I stuck them down onto like-colored felt, trimmed around them, and glued them with a couple of dots of hot glue.  Then I lined clips with ribbon and glued the felt stickers to the clips.  For the four little flower stickers, I cut out a felt leaf and glued them to it in a bunch.


For just a few dollars and few minutes of my time, I was able to make the following clips, plus 5 others that went to my neighbor's 4-year-old daughter.


Now I need to make another hair clip holder.  Theirs is entirely full.  But a girl can never have too many hair accessories, can she?
Pin It

Tuesday, February 14, 2012

Hair bows

My friend Brooke came over last night.  We had grand plans for a craft night.  She has a friend with a new baby that she wanted to make a collection of hair clips for.  I was going to make several myself, for my girls.  Or maybe knit a hat for Brooke's daughter (which I'm making today instead).

However, my hubby had also run to the store and bought me Breaking Dawn part 1 to watch (yes, I'm Team Edward).

So, we sat down and started chatting.  I was holding Little Love #6 (who wants to be held 24-7), and she started making some hair clips for my girls.  She had some cute Hello Kitty ribbon that she had used for her daughter, and she had plenty left for bows for my girls.


Brooke made 6 hair clips for my daughters.


As she was finishing the last of these, we turned the movie on, planning to watch while we worked.


However, the movie was a bit distracting.  We got nothing else done.  Whoops!!  Oh well.  We still had a lot of fun, and my girls got 6 adorable new bows!!!
Pin It

Friday, February 3, 2012

Bandanna Skirts and Hair Clips

A couple of weeks ago, I saw this tutorial for how to make "The Handkerchief Hem Bandana Skirt" on Designed by Dawn Nicole.  I fell in love with it immediately and knew that I had to make some for my Little Love #5.  So I ran out (well, at that time I was 9 months pregnant, so I waddled out) to the craft store and bought some bandannas.


So, these skirts really are super simple to make.  Somehow, I managed to royally mess up my math and ended up with way too large of holes in the centers of the bandannas (and, of course, I cut all 4 before opening one up to look at it), but they still managed to turn out fine.  But, as the old adage says, make sure you measure twice and cut once.  I made these with a couple-of-days-old-baby in the house, so I'll blame sleep deprivation.  =)  This one will be perfect for Valentine's Day.


I then had the circles I had cut out of the centers of the bandannas, so I used those to make matching hair clips following this tutorial on Fabric Bows and More.  I pinked the edges of the black-and-white ones and frayed the edges of the heart ones.


Anyway, this project was super cheap, super fast, and super easy.  I used latex-free elastic, and the bandannas are 100% cotton, so my daughter can wear them with no problems.  I love how it all turned out!


Pin It

Friday, December 16, 2011

Felt Flowers

Ok, I know there's been a major hair clip theme lately.  But you're limited with what you can do when you're on bed rest for preterm contractions.  Plus, when you're expecting your fourth girl, you have frillies on the brain!  (At least I do have 2 boys mixed in there, too.  It helps keep me up-to-date with all the latest sound effects.)

Anyway, the other day I came across this felt flower tutorial through Fabric Bows and More.  I went more than a little flower crazy, playing with size, color, number of flowers, etc!!


I made a couple of other pairs that I gave away.  I showed these to my friend and neighbor, and she made some where she alternated colors in one flower.  They're gorgeous!  So I have a feeling I may be making some of those tomorrow.  I also may play with making some and gluing a bead in the center, or maybe lining the edges of the petals with glitter.  What little girl doesn't like some sparkle?

These seriously take mere minutes to make.  If you have a large 5-petal flower punch, making a pattern is super-easy.  If not, I found easy-to-follow instructions here on You Tube.

I love them!!

Pin It

Tuesday, December 13, 2011

Another Hair Clip Gift

A friend of mine emailed me the other day.  She wanted to make some hair clippies for her daughter for Christmas but found herself running out of time.  So, I told her that I would make them for her, and in exchange she's giving me some venison!!  WOO HOO!!!!  I've been wanting my hubby to get us a deer, but he hasn't gone hunting.  So this is GREAT!!!

It worked out with good timing.  I'm officially on modified bed rest for preterm contractions (modified, because it's impossible for me to not get up when I have 5 other kids to take care of!), so this gave me a project to fill a couple of hours during which I wouldn't be getting much done, anyway.  She had no specific requests, so I tried to simply make a variety.

She did say that she really liked the ribbon flowers I've made in the past, so I made a couple of sets of those (you can see originals at the bottom of this post):


I loved the lace bows I made recently, so I made some of those (these look blue-and-black, but they're really purple-and-black):


I love double-layered bows, so I made one of those, as well as a bow from some leftover gift package ribbon I had:


And here are two other bows I made from fancy gift package ribbon, and wrapped with a feather boa:


I also made her a woven headband, which she can either wear by itself or with any of her clips clipped to it (again, the colors are a bit wonky.  It's black, pale pink, and lavender):


I hope you like them all, Vanessa and Lydia!  Merry Christmas!!


Pin It

Saturday, December 10, 2011

Festive Hair Clips

I love the holidays, and I love holiday bling.  No, I'm not talking ugly Christmas sweaters, but I have a Christmas bracelet and a silver Christmas tree necklace.

Last year, I made my girls matching Christmas headbands.  


They still wear those, but this year I wanted to do clips.  I was going to do mistletoe ones at first.  Then my friend Brooke came over, and we decided to do holly, instead.  To make it even more fun, we did it in different colors and used single-prong clips so we could clip them onto thin, satin-covered headbands.


We started by cutting out the leaves and berries out of felt.  I don't know if we're super-silly, super-picky, or super-untalented, but it took us forever to get exactly the shape we were wanting for the leaves.  We then stitched a couple of stitches down the center of each leaf.  We sewed the leaves together, then glued on the berries and a cluster of seed beads.  For the headbands, we had thin, satin-covered ones from Wal-Mart.  We took a short piece of 3/8"grosgrain ribbon and hot-glued it around the headband to make a tight loop to clip the clips to.


I made the traditional green-and-red, a classy black-and-white, and a fun pink-and-brown.  I love how they came out!!  My girls love them, too!


Pin It

Thursday, November 17, 2011

Hair Clip Gift

First of all, for those of you who were wondering, the Lord really answered prayers this week, and Little Love #5 never got the bad respiratory phase of the virus she had!  (If you have no idea what I'm talking about, you can see Monday's post here.)  Thank you to anybody who sent up a word of prayer for her!

Anyway, on to today's excitement!  One of our nieces just had her 3rd birthday.  What's more fun than a little bit of hair frosting for a little girl?!?!?!?  So I made her some hair clips.  

Remember all of that lace I got at Wal-Mart for $.50 for 3 yards?


I came across this lace bow tutorial at Fabric Bows and More.  I LOVED them, so I made these:


I loved these so much I made extra sets for my girls.  My favorites are the red and black ones--especially going into the Christmas season!


I also made her a purple-and-green-striped woven headband:


I love making woven headbands!  And then you can clip any hair clips onto them!  I got my instructions for them from No Bow...No Go!  Her instructions are GREAT, so easy to follow, and have great pictures to help you make sure you're doing it right.

I also made a few other clips, so I feel like it's a nice package to add to her clippie collection.  


Happy Birthday!!


Pin It

Monday, October 10, 2011

Easy and Inexpensive Hair Clips

Ok, it simply doesn't get any easier than this.  Wal-Mart is now carrying all sorts of hair clip possibilities:  bows, feathers, etc.  I saw this one the other day, and my 8-year-old begged me to make a hair clip out of it.  She pointed out that it would be perfect for the Halloween season.  What can I say?  I'm a sucker for her begging, I'm a sucker for cute hair clips, and I'm a sucker for Halloween.  So it came home with us.


This one's big enough that I didn't even have to line the clip with a ribbon.  A bit of hot glue (or you can use two-sided tape), and you're good to go!

I know that WAHM's who make clippies hate the big stores getting into the clippie game.  I completely understand.  And if you have a specific outfit with certain colors that you want matched, or if you have a particular idea of what you want in mind, or you want something 100% unique to your daughter, a WAHM is definitely the way to go.

But for those of us who like making our own and don't make them for profit, I love being able to pick up cute things like this that are virtually ready-to-go.  I've even picked up a couple of corkers at Target, already on lined clips and ready to wear!


Headbands, too!  I bought this Halloween headband last year--I think it was at Wal-Mart.


Yes, I could have made all of these things myself, but for a couple of dollars, it was more worthwhile to buy them ready-to-go, or with minimal time needed.  

So if you like having really cute hair accessories on your girls--but don't want to spend a lot of time or money--and you don't mind that there may be a few thousand other girls out there with the same exact thing, start looking around the craft section of your local store.  You may be surprised by what you find there!
Pin It

Tuesday, September 20, 2011

Woven Headbands

Can you tell I really love making fun and pretty things for my girls' hair?  And I found out recently that we're going to have our fourth girl soon!!  Yay, more fun, pretty hair stuff!  The boys are getting a bit out-numbered, though...

Anyway, last night my neighbor and friend, Brooke, came over to make some woven headbands with me.


Unfortunately, I can't do a tutorial for you all.  I bought the most awesome instructions from No Bow...No Go!, so I can't post the instructions here.  But you should check out her site.  She has some free tutorials and lots of other great ones.  Her one for woven headbands shows you how to make all sorts of different designs, and her instructions and pictures are beautifully clear.  One of my favorites is the Christmas one.


I also like making holiday-themed ones, like this one for Independence Day.


Halloween is coming up, so I see some really cute ones in the immediate future!  

One of the best things about woven headbands is that you can clip a clippie to the ribbons.  So there are so many cute things you can do with them!


On a different note, I finally started 2 projects with the chalkboard paint, but you have a to wait a few days before you can write on it.  So those posts will hopefully be ready later this week!

What have you been working on lately?


Pin It

Monday, September 5, 2011

Hair Bow Tutorial

A while back I posted pictures of these hair clips that my friend, Brooke, taught me how to make:


A couple of you have asked me for a tutorial on how to make them, so here it is!  They're really quick and simple.  

Start out by making yourself some helping forms.  These were cut out of a cardboard box.  


Both are around 4 1/2" long, and the cut-out part in the middle is 2 1/2" long.  The big one is 4" wide, the small one is 2 3/4" wide, and the cut-out is 1" wide.

Pick what ribbons you want to use for the larger, bottom layer and for the smaller, top layer.  In the ones above I used a satin ribbon on bottom and a sheer on top.  For the one today I used a part-sheer 1 1/2" wide ribbon on bottom, a sheer 3/4" one on top.  Feel free to mix it up and try new things!  Scroll down for a few more examples.

Start by cutting the larger ribbon to a point on the end.  Don't forget to burn the ends so they don't unravel.  Using the larger form, put the point 1/2 on the form, 1/2 off, and wrap it 3-4 times.  I did 3 wraps here.  Cut the other end to a point.  Both points should be pointing toward the outside.  Put a clip on it in the form cut-out to hold the ribbon for you while you thread a needle.  Don't forget to burn the other end of the ribbon.  (I don't measure the ribbon out ahead of time.  I wrap the ribbon while it's still on the spool then cut it off at the end--that way, there's no wasted ribbon.)


Thread a needle with a single strand of embroidery floss, or something equally strong (thicker than just plain thread).  Slide the ribbon gently off the form and start sewing.  I find it works better to begin with the needle coming up, end with it going down.  Here it is off the form with the needle started in it.


Do several stitches across all the ribbon layers.  Don't pull the needle through the fabric yet--first, bunch the ribbon on the needle into a bow, like this:


Pull the thread halfway through, so there's a long length of thread on either side of the bow.  Wrap it tightly in both directions and tie in a double knot.  This is the bottom layer of the bow.  Leave the tails of your string long.


Do the same thing with the smaller ribbon on the smaller form.  (Sorry, I didn't get pictures of this.  It essentially looks the same as above.)  Lay the smaller bow on top of the larger bow, making sure that all the tails are pointing the same direction.  Take the long ends on the large bow and wrap them tightly around both bows, tying them together.


Now it's time to wrap the center.  The bows at the top of this post use eyelash yarn.  On this bow, I decided to use a white feather boa.  You can tie or hot glue these, depending on what your preference is.


The possibilities and variations with this are endless.  The other day, I found some lace in the clearance section at Wal-Mart.  Each bubble held 9 feet of lace, and they were on sale for $0.50 each!!


I knew I had to use some on one of these bows.  This is the final result:


How gorgeous is that?

I recently received a gift with this adorable ribbon on it:


Not wanting to cover up or detract from the sparkly flowers, I decided to make a single-layer bow out of it.  For the center, I used a simple, sparkly silver flower.


So go make some bows!  Be creative with ribbons, textures, beads, and whatever else you have laying around.  I'd love to see what you make, so please feel free to e-mail me photos!
Pin It

Thursday, July 28, 2011

Fun Hair Stuff

Ok, so here are the hair clips and headband I made the other night.  I didn't make as many as I thought I was going to, but I admit I was somewhat distracted by the movie "Letters to Juliet."  =)

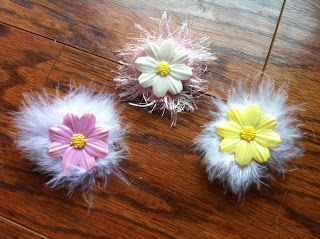
First, I had these flowers I had gotten off of some cupcakes:


Some of them I hot-glued to a headband.  I first covered the headband with a purple satin ribbon.


The remaining flowers I used for clips.  First I glued a ring of feather boa to ribbon-lined clips, then I glued the flowers on top.


Remember these cute little fishies?


I cut them some "water" out of felt and glued them down on top.  I don't know why I love these so much, but I do!  My girls do, too!


I also made these because I had some really cute polka-dot ribbon that I hadn't done anything with yet.  I LOVE how they turned out!  I think these are my favorites of this batch!


Hope to make some more soon, but that's it for the other night.  Maybe next time I should focus more on what I'm doing and less on the movies.  I bet you I'd get less burns that way, too...  =)


Pin It